The list goes on.
And seriously... do you really need that?
Let's face it. All of that prettiness goes away the second you start planting. The edging designs get chipped or covered with leaves so that they can't be seen. The hanging planter loses the vibrant color it originally displayed, and the cloth planter is soaked and covered with mud.
You should have just made your own.
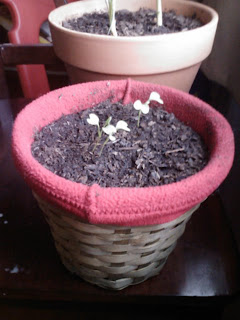
I finally learned that lesson this year, and created my own small planter in an attempt to garden on the cheap. It sure took long enough, right?
The best part is that it only cost me one dollar, and was extraordinarily simple.
As a special bonus, it hasn't leaked at all since I created it, while still allowing for the possibility if I over-water and need drainage.
So what do you do for this quick and easy DIY planter project?
Let's start with the supplies. You'll need:
- An old pair of pants, destined for the trash.
- scissors
- A cheap basket. I got mine at a thrift store for a dollar.
That's it! I told you it was easy!
I have an old pair of pajama pants that I bought when I was pregnant with my daughter. They're way too big now, and have been for years. That, and they're bright red.
And ugly.
With a smile on my face, I began step one:
1. Measure how much of the leg needs to be cut in order to line the inside of the basket, then slice it off about three inches higher than that.
 |
| Goodbye, yucky clown pants!!! |
2. Take the tubular piece that you've cut off, and line the basket with it, folding it over the top of the basket to keep it in place.
3. There should be extra fabric at the bottom of the basket. Fold it over so that there isn't a gigantic hole at the bottom.
4. Fill your planter with dirt, add some sprouts, and smile. Your work is done.
See? I told you this was a cheap DIY project. Really, if you already have a basket at home, you can save yourself the trip to the thrift store, and it'll cost you nothing at all.
Bonus!
And projects don't get easier than this planter. No hammering, no sewing. No taping or gluing. Just a quick clip with scissors and some folding.
Ahhh, the good life...
***Note:
The rim of this basket had a diameter of about 7 inches, making it perfect for a good tight fit with the pants. Consider the size of the clothing before choosing a pot. Alternately, you can use a much wider pot and use a shirt, folding the arms, and closing the neck. Kind of like what I did with my yarn basket.


No comments:
Post a Comment